基础知识
hello
dart
go
js
python
helloword
dart
// helloword.dart
// 定义个方法。
printNumber(num aNumber) {
  print('The number is $aNumber.'); // 在控制台打印内容。
}

// 这是程序执行的入口。
// 每个应用都需要有个顶级的 main() 入口方法才能执行。
// main() 方法的返回值为 void 并且有个可选的 List<String> 参数。
main() {
  var number = 42; // 定义并初始化一个变量。
  printNumber(number); // 调用一个方法。
}
dart helloword.dartgo
// helloword.go
package main
import "fmt"
func main() {
  fmt.Println("Hello, world")
}

// helloword.go
package main
import (
  "fmt"
  "time"
)
func main() {
  fmt.Println("Welcome to the playground!")
  fmt.Println("The time is", time.Now())
}
go run helloword.gojs
// helloword.jsnode helloword.jspython
print('hello, world')概念
dart
- 所有能够使用变量引用的都是对象, 每个对象都是一个类的实例。 在 Dart 中 甚至连 数字、方法和 null 都是对象。 所有的对象都继承于 Object 类。
- 没有指定类型的变量的类型为 dynamic
- Dart 支持顶级方法 (例如 main())
- Dart 还支持顶级变量,以及 在类中定义变量(静态变量和实例变量)。 实例变量有时候被称之为域(Fields)或者属性(Properties)
- Dart 没有 public、 protected、 和 private 关键字。 如果一个标识符以 (_) 开头,则该标识符 在库内是私有的。
go
- 每个 Go 程序都是由包构成的。
- 程序从
main包开始运行。 -
按照约定,包名与导入路径的最后一个元素一致。
例如,"math/rand" 包中的源码均以
package rand语句开始。 - 传指针比较轻量级 (8bytes),只是传内存地址,我们可以用指针传递体积大的结构体。 如果用参数值传递的话, 在每次copy上面就会花费相对较多的系统开销(内存和时间)。 所以当你要传递大的结构体的时候,用指针是一个明智的选择。
- Go语言中channel,slice,map这三种类型的实现机制类似指针, 所以可以直接传递,而不用取地址后传递指针。 (注:若函数需改变slice的长度,则仍需要取地址传递指针)
js
- ECMAScript 和 JavaScript 的关系是,前者是后者的规格,后者是前者的一种实现
- ES6 这个词的原意,就是指 JavaScript 语言的下一个版本
- ES6 既是一个历史名词,也是一个泛指,含义是 5.1 版以后的 JavaScript 的下一代标准, 涵盖了 ES2015、ES2016、ES2017 等等
JavaScript学习内容包括
- ES5
- ES6
- DOM
- 浏览器
- Node.js
- TypeScript
python
安装
dart
# Enable HTTPS for apt.
$ sudo apt-get update
$ sudo apt-get install apt-transport-https
# Get the Google Linux package signing key.
$ sudo sh -c 'curl https://dl-ssl.google.com/linux/linux_signing_key.pub | apt-key add -'
# Set up the location of the stable repository.
$ sudo sh -c 'curl https://storage.googleapis.com/download.dartlang.org/linux/debian/dart_stable.list > /etc/apt/sources.list.d/dart_stable.list'
$ sudo apt-get update

$ sudo apt-get install dart
go
# 卸载旧版本
sudo rm -rf /usr/local/go

# 下载此压缩包并提取到 /usr/local 目录,在 /usr/local/go 中创建Go目录树。
# 该压缩包的名称可能不同,这取决于你安装的Go版本和你的操作系统以及处理器架构。
sudo tar -C /usr/local -xzf go$VERSION.$OS-$ARCH.tar.gz

# 要将 /usr/local/go/bin 添加到 PATH 环境变量,
# 你需要将此行添加到你的 /etc/profile(全系统安装)或 $HOME/.profile 文件中:
export PATH=$PATH:/usr/local/go/bin

# 安装到指定位置
# GOROOT 仅在安装到指定位置时才需要设置。
export GOROOT=$HOME/go
export PATH=$PATH:$GOROOT/bin

# 测试你的安装
# package main
# import "fmt"
# func main() {
#     fmt.Printf("hello, world\n")
# }
go run hello.go

# GOPATH 环境变量
# GOPATH 环境变量指定了你的工作空间位置。
# 注意,它绝对不能和你的Go安装目录相同。
mkdir $HOME/work
export GOPATH=$HOME/work
export PATH=$PATH:$GOPATH/bin
js
python
# 创建虚拟环境
python3 -m venv tutorial-env
# 创建虚拟环境后,您可以激活它。
source tutorial-env/bin/activate
常用命令
dart
go
js
Reflect.ownKeys(''.__proto__)
Reflect.ownKeys(String.prototype)

// Object.getOwnPropertyNames方法返回一个数组,
// 成员是参数对象本身的所有属性的键名,不包含继承的属性键名。
Object.getOwnPropertyNames(Date)
python
>>> import fibo, sys
>>> dir(fibo)
['__name__', 'fib', 'fib2']
>>> dir(sys)
['__displayhook__', '__doc__', '__excepthook__', '__loader__', '__name__',
 '__package__', '__stderr__', '__stdin__', '__stdout__',
 '_clear_type_cache', '_current_frames', '_debugmallocstats', '_getframe',
 '_home', '_mercurial', '_xoptions', 'abiflags', 'api_version', 'argv',
 'base_exec_prefix', 'base_prefix', 'builtin_module_names', 'byteorder',
 'call_tracing', 'callstats', 'copyright', 'displayhook',
 'dont_write_bytecode', 'exc_info', 'excepthook', 'exec_prefix',
 'executable', 'exit', 'flags', 'float_info', 'float_repr_style',
 'getcheckinterval', 'getdefaultencoding', 'getdlopenflags',
 'getfilesystemencoding', 'getobjects', 'getprofile', 'getrecursionlimit',
 'getrefcount', 'getsizeof', 'getswitchinterval', 'gettotalrefcount',
 'gettrace', 'hash_info', 'hexversion', 'implementation', 'int_info',
 'intern', 'maxsize', 'maxunicode', 'meta_path', 'modules', 'path',
 'path_hooks', 'path_importer_cache', 'platform', 'prefix', 'ps1',
 'setcheckinterval', 'setdlopenflags', 'setprofile', 'setrecursionlimit',
 'setswitchinterval', 'settrace', 'stderr', 'stdin', 'stdout',
 'thread_info', 'version', 'version_info', 'warnoptions']

# 如果没有参数,dir() 会列出你当前定义的名称:
>>> a = [1, 2, 3, 4, 5]
>>> import fibo
>>> fib = fibo.fib
>>> dir()
['__builtins__', '__name__', 'a', 'fib', 'fibo', 'sys']

# dir() 不会列出内置函数和变量的名称。如果你想要这些,它们的定义是在标准模块 builtins 中:
>>> import builtins
>>> dir(builtins)
['ArithmeticError', 'AssertionError', 'AttributeError', 'BaseException',
 'BlockingIOError', 'BrokenPipeError', 'BufferError', 'BytesWarning',
 'ChildProcessError', 'ConnectionAbortedError', 'ConnectionError',
 'ConnectionRefusedError', 'ConnectionResetError', 'DeprecationWarning',
 'EOFError', 'Ellipsis', 'EnvironmentError', 'Exception', 'False',
 'FileExistsError', 'FileNotFoundError', 'FloatingPointError',
 'FutureWarning', 'GeneratorExit', 'IOError', 'ImportError',
 'ImportWarning', 'IndentationError', 'IndexError', 'InterruptedError',
 'IsADirectoryError', 'KeyError', 'KeyboardInterrupt', 'LookupError',
 'MemoryError', 'NameError', 'None', 'NotADirectoryError', 'NotImplemented',
 'NotImplementedError', 'OSError', 'OverflowError',
 'PendingDeprecationWarning', 'PermissionError', 'ProcessLookupError',
 'ReferenceError', 'ResourceWarning', 'RuntimeError', 'RuntimeWarning',
 'StopIteration', 'SyntaxError', 'SyntaxWarning', 'SystemError',
 'SystemExit', 'TabError', 'TimeoutError', 'True', 'TypeError',
 'UnboundLocalError', 'UnicodeDecodeError', 'UnicodeEncodeError',
 'UnicodeError', 'UnicodeTranslateError', 'UnicodeWarning', 'UserWarning',
 'ValueError', 'Warning', 'ZeroDivisionError', '_', '__build_class__',
 '__debug__', '__doc__', '__import__', '__name__', '__package__', 'abs',
 'all', 'any', 'ascii', 'bin', 'bool', 'bytearray', 'bytes', 'callable',
 'chr', 'classmethod', 'compile', 'complex', 'copyright', 'credits',
 'delattr', 'dict', 'dir', 'divmod', 'enumerate', 'eval', 'exec', 'exit',
 'filter', 'float', 'format', 'frozenset', 'getattr', 'globals', 'hasattr',
 'hash', 'help', 'hex', 'id', 'input', 'int', 'isinstance', 'issubclass',
 'iter', 'len', 'license', 'list', 'locals', 'map', 'max', 'memoryview',
 'min', 'next', 'object', 'oct', 'open', 'ord', 'pow', 'print', 'property',
 'quit', 'range', 'repr', 'reversed', 'round', 'set', 'setattr', 'slice',
 'sorted', 'staticmethod', 'str', 'sum', 'super', 'tuple', 'type', 'vars',
 'zip']
保留字
| dart | go | js | python |
|---|---|---|---|
| abstract | -abstract | ||
| - | arguments | ||
| - | and | ||
| as | as | ||
| assert | assert | ||
| async | async | ||
| async* | |||
| await | await* | await | |
| - | -boolean | ||
| break | break | break | break |
| - | -byte | ||
| case | case | case | |
| catch | catch | ||
| - | chan | ||
| - | -char | ||
| class | class | class | |
| const | const | const | |
| continue | continue | continue | continue |
| - | debugger | ||
| - | def | ||
| default | default | default | |
| - | defer | ||
| deferred | |||
| - | del | ||
| - | delete | ||
| do | do | ||
| - | -double | ||
| dynamic | |||
| - | elif | ||
| else | else | else | else |
| enum | enum | ||
| - | eval | ||
| - | except | ||
| export | export | ||
| extends | extends | ||
| external | |||
| factory | |||
| - | fallthrough | ||
| false | false | False | |
| final | -final | ||
| finally | finally | finally | |
| - | -float | ||
| for | for | for | for |
| - | from | ||
| - | func | ||
| - | function | ||
| get | |||
| - | global | ||
| - | go | ||
| - | goto | -goto | |
| if | if | if | if |
| implements | implements | ||
| import | import | import | import |
| in | in | in | |
| - | instanceof | ||
| - | -int | ||
| - | interface | interface | |
| is | is | ||
| - | lambda | ||
| - | let | ||
| library | |||
| - | -long | ||
| - | map | ||
| - | -native | ||
| new | new | ||
| - | None | ||
| - | nonlocal | ||
| - | not | ||
| null | null | ||
| operator | |||
| - | or | ||
| - | package | package | |
| part | |||
| - | pass | ||
| - | private | ||
| - | protected | ||
| - | public | ||
| - | raise | ||
| - | range | ||
| rethrow | |||
| return | return | return | return |
| - | select | ||
| set | |||
| - | -short | ||
| static | static | ||
| - | struct | ||
| super | super | ||
| switch | switch | switch | |
| sync | |||
| sync* | |||
| - | -synchronized | ||
| this | this | ||
| throw | throw | ||
| - | -throws | ||
| - | -transient | ||
| true | true | True | |
| try | try | try | |
| - | type | ||
| typedef | typeof | ||
| var | var | var | |
| void | void | ||
| - | -volatile | ||
| while | while | while | |
| with | with | with | |
| yield | yield | yield | |
| yield* |
go
#内建常量:
true false iota nil

#内建类型:
int int8 int16 int32 int64
uint uint8 uint16 uint32 uint64 uintptr
float32 float64 complex128 complex64
bool byte rune string error

#内建函数:
make len cap new append copy close delete
complex real imag
panic recover
库包模块
dart
Dart 有两种类型的包: 应用 包 和 库 包。
最简单的库包的 目录结构: 通常情况下都把实现代码放到
lib/src 目录中。 位于
lib/src 下面的代码被认为是私有的; 其他包不应该直接导入
src/... 里面的代码。
要分享 lib/src 下的 API,你可以在 lib 目录下 创建一个文件, 在这个文件中导入 lib/src 中的代码。
root ------lib-----file.dart
|--pubspec.yaml- 库不仅仅提供 API, 还是一个私有单元: 以下划线 (_) 开头的标识符只有在库 内部可见。 每个 Dart app 都是一个库, 即使没有使用 library 命令也是一个库
- import 必须参数为库 的 URI。 对于内置的库,URI 使用特殊的 dart: scheme。 对于其他的库,你可以使用文件系统路径或者 package: scheme。 package: scheme 指定的库通过包管理器来提供, 例如 pub 工具。
import 'dart:html';
import 'dart:io';
import 'package:mylib/mylib.dart';
import 'package:utils/utils.dart';

// Specifying a library prefix(指定库前缀)
import 'package:lib1/lib1.dart';
import 'package:lib2/lib2.dart' as lib2;
// ...
Element element1 = new Element();           // Uses Element from lib1.
lib2.Element element2 = new lib2.Element(); // Uses Element from lib2.

// Importing only part of a library(导入库的一部分)
// Import only foo.
import 'package:lib1/lib1.dart' show foo;
// Import all names EXCEPT foo.
import 'package:lib2/lib2.dart' hide foo;

// Lazily loading a library(延迟载入库)
// 可以多次调用 loadLibrary() 函数。 但是该库只是载入一次
import 'package:deferred/hello.dart' deferred as hello;
greet() async {
  await hello.loadLibrary();
  hello.printGreeting();
}


import 'french.dart';
export 'french.dart' show hello;

// 引入某个库的多个对象
import 'package:flutter/material.dart' show StatefulWidget, StatelessWidget;
go
每个源文件都是以包的声明语句开始,用来指明包的名字。 当包被导入的时候,包内的成员将通过类似tempconv.CToF的形式访问。 而包级别的名字,例如在一个文件声明的类型和常量, 在同一个包的其他源文件也是可以直接访问的,就好像所有代码都在一个文件一样。
Go语言的代码通过包(package)组织, 包类似于其它语言里的库(libraries)或者模块(modules)。 一个包由位于单个目录下的一个或多个.go源代码文件组成, 目录定义包的作用。 每个源文件都以一条package声明语句开始,这个例子里就是package main, 表示该文件属于哪个包,紧跟着一系列导入(import)的包,之后是存储在这个文件里的程序语句。
在Go语言程序中,每个包都有一个全局唯一的导入路径。 一个导入路径代表一个目录中的一个或多个Go源文件。
Go的标准库提供了100多个包,以支持常见功能,如输入、输出、排序以及文本处理。
main包比较特殊。它定义了一个独立可执行的程序,而不是一个库。
此代码用圆括号组合了导入,这是“分组”形式的导入语句。 不过使用分组导入语句是更好的形式。
在 Go 中,如果一个名字以大写字母开头,那么它就是已导出的。 例如,Pizza 就是个已导出名,Pi 也同样,它导出自 math 包。 pizza 和 pi 并未以大写字母开头,所以它们是未导出的。 在导入一个包时,你只能引用其中已导出的名字。 任何“未导出”的名字在该包外均无法访问。
言外之意,
大写字母开头的变量会导出给其他包使用,
小写字母开头的变量为包内私有,不会导出
-
Go源文件中的第一个语句必须是
package 名称 -
这里的 名称 即为导入该包时使用的默认名称。 (一个包中的所有文件都必须使用相同的 名称。)
-
Go的约定是包名为导入路径的最后一个元素:作为 “crypto/rot13” 导入的包应命名为 rot13。
-
可执行命令必须使用
package main。 -
链接成单个二进制文件的所有包,其包名无需是唯一的,只有导入路径(它们的完整文件名) 才是唯一的。
在 src/pkg/encoding/base64 中的包应作为
encoding/base64 导入,
import (
  "fmt"
  "math"
)
// 等同于
import "fmt"
import "math"

// 别名操作
import(
  f "fmt"
)

// math包内的Pi即为导出的
func main() {
  fmt.Println(math.Pi)
}
# 若你在包的导入路径中包含了代码仓库的URL,go get 就会自动地获取、 构建并安装它:
$ go get github.com/golang/example/hello
$ $GOPATH/bin/hello
Hello, Go examples!
# 在执行完上面的go get 命令后,工作空间的目录树看起来应该是这样的:
bin/
hello # command executable
src/
github.com/golang/example/
.git/ # Git repository metadata
hello/
hello.go # command source
stringutil/
reverse.go # package source
reverse_test.go # test source
github.com/user/
hello/
hello.go # command source
stringutil/
reverse.go # package source
reverse_test.go # test sourcejs
- 一个Node.js文件就是一个模块
-
包是在模块基础上更深一步的抽象,使用npm来解决包的发布和获取,
package.json必须在包的顶层目录下
import { stat, exists, readFile } from 'fs';
import _, { each, forEach } from 'lodash';
// 整体加载的写法
import * as circle from './circle';

// profile.js
export var firstName = 'Michael';
export var lastName = 'Jackson';
export var year = 1958;

// profile.js
var firstName = 'Michael';
var lastName = 'Jackson';
var year = 1958;
export { firstName, lastName, year };

// export-default.js
export default function () {
  console.log('foo');
}
// import-default.js
import customName from './export-default';
customName(); // 'foo'

export { foo, bar } from 'my_module';
// 可以简单理解为
import { foo, bar } from 'my_module';
export { foo, bar };
python
- module:一个文件就是一个模块
- package:包是一个包含init.py 文件的目录 包是一种通过用“带点号的模块名”来构造 Python 模块命名空间的方法。
- lib:库是完成一定功能的代码集合,在python中是包和模块的形式
当一个名为 spam 的模块被导入的时候, 解释器首先寻找具有该名称的内置模块。 如果没有找到,然后解释器从 sys.path 变量给出的目录列表里寻找名为 spam.py 的文件。 sys.path 初始有这些目录地址:
- 包含输入脚本的目录(或者未指定文件时的当前目录)。
- PYTHONPATH (一个包含目录名称的列表,它和shell变量 PATH 有一样的语法)。
- 取决于安装的默认设置
# fibo.py
def fib(n):    # write Fibonacci series up to n
  a, b = 0, 1
  while a < n:
    print(a, end=' ')
    a, b = b, a+b
  print()
def fib2(n):   # return Fibonacci series up to n
  result = []
  a, b = 0, 1
  while a < n:
    result.append(a)
    a, b = b, a+b
  return result

#
import fibo
fibo.fib(1000)
#
from fibo import fib, fib2
fib(1000)
#
from fibo import *
fib(1000)
#
import fibo as fib
fib.fib(500)
#
from fibo import fib as fibonacci
fibonacci(500)

# 以脚本的方式执行模块
# python fibo.py <arguments>
if __name__ == "__main__":
    import sys
    fib(int(sys.argv[1]))

# 子包参考
from . import echo
from .. import formats
from ..filters import equalizer
包管理工具
dart
You can use pub to manage Dart packages.
# pubspec.yaml
name: my_app
dependencies:
  js: ^0.3.0
  intl: ^0.12.4
# Installing packages
cd <path-to-my_app>
pub get
# Upgrading a dependency
pub upgrade
# 升级特定的依赖
pub upgrade transmogrifygo
js
python
pip search astronomy
pip install novas
pip install requests==2.6.0
pip install --upgrade requests
pip show requests
pip list
pip freeze > requirements.txt
pip install -r requirements.txt
项目结构
dart
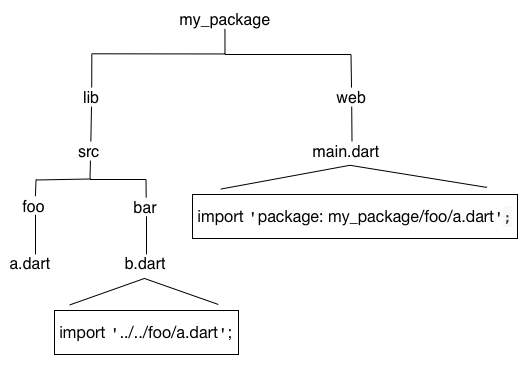
库包的代码位于 lib 目录中, 在其他包中可以访问这里面的代码。 在 lib 目录下可以创建任意的目录结构。 通常情况下都把实现代码放到 lib/src 目录中。 位于 lib/src 下面的代码被认为是私有的; 其他包不应该直接导入 src/... 里面的代码。 要分享 lib/src 下的 API,你可以在 lib 目录下 创建一个文件, 在这个文件中导入 lib/src 中的代码。
最简单的库包的 目录结构

shelf 库的目录结构

在 lib 和 web 库中如何导入 lib/src/foo/a.dart
go
Go代码必须放在工作空间内。它其实就是一个目录,其中包含三个子目录:
- src 目录包含Go的源文件,它们被组织成包(每个目录都对应一个包),
- pkg 目录包含包对象,
- bin 目录包含可执行命令。
go 工具用于构建源码包,并将其生成的二进制文件安装到 pkg 和 bin 目录中。 src 子目录通常包会含多种版本控制的代码仓库(例如Git或Mercurial), 以此来跟踪一个或多个源码包的开发。
# 此工作空间包含三个代码库(goauth2、streak 和 todo),
# 两个命令(streak 和 todo) 以及两个库(oauth 和 task)。
bin/
  streak                         # 可执行命令
  todo                           # 可执行命令
pkg/
  linux_amd64/
    code.google.com/p/goauth2/
      oauth.a                # 包对象
    github.com/nf/todo/
      task.a                 # 包对象
src/
  code.google.com/p/goauth2/
    .hg/                       # mercurial 代码库元数据
    oauth/
      oauth.go               # 包源码
      oauth_test.go          # 测试源码
  github.com/nf/
    streak/
      .git/                      # git 代码库元数据
      oauth.go               # 命令源码
      streak.go              # 命令源码
    todo/
      .git/                      # git 代码库元数据
      task/
        task.go            # 包源码
      todo.go                # 命令源码
// hello.go
package main
import (
"fmt"
"github.com/user/stringutil"
)
func main() {
fmt.Printf(stringutil.Reverse("!oG ,olleH"))
}
// reverse.go
// stringutil 包含有用于处理字符串的工具函数。
package stringutil
// Reverse 将其实参字符串以符文为单位左右反转。
func Reverse(s string) string {
r := []rune(s)
for i, j := 0, len(r)-1; i < len(r)/2; i, j = i+1, j-1 {
r[i], r[j] = r[j], r[i]
}
return string(r)
}# 你的第一个程序
bin/
hello # 可执行命令
pkg/
linux_amd64/ # 这里会反映出你的操作系统和架构
github.com/user/
stringutil.a # 包对象
src/
github.com/user/
hello/
hello.go # 命令源码
stringutil/
reverse.go # 包源码
# 创建目录
mkdir $GOPATH/src/github.com/user/hello
# 用 go build 命令来测试该包
# 它会将包的对象放到工作空间的 pkg 目录中
# 这不会产生输出文件。想要输出的话,必须使用 go install 命令
go build github.com/user/stringutil
# 若你在该包的源码目录中,只需执行
go build
# 用 go 工具构建并安装此程序
# 此命令会构建 hello 命令,产生一个可执行的二进制文件。
# 接着它会将该二进制文件作为 hello(在 Windows 下则为 hello.exe)安装到工作空间的 bin 目录中。
# go 工具只有在发生错误时才会打印输出
go install github.com/user/hello
# 或者
cd $GOPATH/src/github.com/user/hello
go install
# 现在,你可以在命令行下输入它的完整路径来运行它了:
$GOPATH/bin/hello
# 若你已经将 $GOPATH/bin 添加到 PATH 中了
hellobin/
hello # command executable
outyet # command executable
src/
github.com/golang/example/
.git/ # Git repository metadata
hello/
hello.go # command source
outyet/
main.go # command source
main_test.go # test source
stringutil/
reverse.go # package source
reverse_test.go # test source
golang.org/x/image/
.git/ # Git repository metadata
bmp/
reader.go # package source
writer.go # package source
... (many more repositories and packages omitted) ...js
常见包结构
├── root
│   ├── src
│   ├── lib
│   ├── dist
│   ├── node_modules
│   ├── package.json
python
sound/                          Top-level package
      __init__.py               Initialize the sound package
      formats/                  Subpackage for file format conversions
              __init__.py
              wavread.py
              wavwrite.py
              aiffread.py
              aiffwrite.py
              auread.py
              auwrite.py
              ...
      effects/                  Subpackage for sound effects
              __init__.py
              echo.py
              surround.py
              reverse.py
              ...
      filters/                  Subpackage for filters
              __init__.py
              equalizer.py
              vocoder.py
              karaoke.py
              ...
# 包的用户可以从包中导入单个模块,例如:
import sound.effects.echo
sound.effects.echo.echofilter(input, output, delay=0.7, atten=4)
# 导入子模块的另一种方法是
from sound.effects import echo
echo.echofilter(input, output, delay=0.7, atten=4)
# 另一种形式是直接导入所需的函数或变量:
from sound.effects.echo import echofilter
echofilter(input, output, delay=0.7, atten=4)
# 文件 sound/effects/__init__.py 可以包含以下代码:
__all__ = ["echo", "surround", "reverse"]
# 当用户写
from sound.effects import *
# 意味着 from sound.effects import * 将导入 sound 包的三个命名子模块命名风格
dart
- UpperCamelCase
- lowerCamelCase
- lowercase_with_underscores
go
- 只包含一个方法的接口应当以该方法的名称加上-er后缀来命名, 如 Reader、Writer、 Formatter、CloseNotifier 等。
标识符
dart
- 包应当以小写的单个单词来命名,且不应使用下划线或驼峰记法。
- 标识符可以以字母或者 _ 下划线开头,后面可以是 其他字符和数字的组合。
go
js
- 第一个字符,可以是任意 Unicode 字母(包括英文字母和其他语言的字母), 以及美元符号($)和下划线(_)。
- 第二个字符及后面的字符,除了 Unicode 字母、美元符号和下划线,还可以用数字0-9。
python
- 大写和小写字母 A 至 Z,下划线 _ 以及数字 0 至 9,但不可以数字打头。
- 标识符的长度没有限制。对大小写敏感。
// 要使用 UpperCamelCase 风格来命名类型名称
class SliderMenu { ... }
class HttpRequest { ... }
typedef bool Predicate<T>(T value);

class Foo {
  const Foo([arg]);
}
@Foo(anArg)
class A { ... }
@Foo()
class B { ... }

const foo = const Foo();
@foo
class C { ... }


// 要使用 lowercase_with_underscores 风格来命名库和文件名名字
library peg_parser.source_scanner;
import 'file_system.dart';
import 'slider_menu.dart';

import 'dart:json' as json;
import 'dart:math' as math;
import 'package:javascript_utils/javascript_utils.dart' as js_utils;
import 'package:js/js.dart' as js;


// 要使用 lowerCamelCase 风格来命名其他的标识符
var item;
HttpRequest httpRequest;
align(clearItems) {
  // ...
}
go
js
python
注释
dart
- 单行注释以 // 开始。
- 多行注释以 /* 开始, */ 结尾。 多行注释 可以 嵌套。
- 文档注释可以使用 /// 开始, 也可以使用 /** 开始 并以 */ 结束。
main() {
  // TODO: refactor into an AbstractLlamaGreetingFactory?
  print('Welcome to my Llama farm!');
}

main() {
  /*
   * This is a lot of work. Consider raising chickens.

  Llama larry = new Llama();
  larry.feed();
  larry.exercise();
  larry.clean();
   */
}

/// A domesticated South American camelid (Lama glama).
///
/// Andean cultures have used llamas as meat and pack
/// animals since pre-Hispanic times.
class Llama {
  String name;

  /// Feeds your llama [Food].
  ///
  /// The typical llama eats one bale of hay per week.
  void feed(Food food) {
    // ...
  }

  /// Exercises your llama with an [activity] for
  /// [timeLimit] minutes.
  void exercise(Activity activity, int timeLimit) {
    // ...
  }
}
go
Go语言支持C风格的块注释 /* */ 和C++风格的行注释 //。
- 每个包都应包含一段包注释,即放置在包子句前的一个块注释。
- 对于包含多个文件的包, 包注释只需出现在其中的任一文件中即可。
- 包注释应在整体上对该包进行介绍,并提供包的相关信息。
在每个源文件的包声明前紧跟着的注释是包注释(§10.7.4)。 通常,包注释的第一句应该先是包的功能概要说明。 一个包通常只有一个源文件有包注释。 如果包注释很大,通常会放到一个独立的doc.go文件中。
/*
  regexp 包为正则表达式实现了一个简单的库。

  该库接受的正则表达式语法为:

  正则表达式:
    串联 { '|' 串联 }
  串联:
    { 闭包 }
  闭包:
    条目 [ '*' | '+' | '?' ]
  条目:
    '^'
    '$'
    '.'
    字符
    '[' [ '^' ] 字符遍历 ']'
    '(' 正则表达式 ')'
*/
package regexp
// path 包实现了一些常用的工具,以便于操作用反斜杠分隔的路径.

// 表达式解析失败后返回错误代码。
var (
  ErrInternal      = errors.New("regexp: internal error")
  ErrUnmatchedLpar = errors.New("regexp: unmatched '('")
  ErrUnmatchedRpar = errors.New("regexp: unmatched ')'")
  // ...
)
js
python
# 一个多行文档字符串的例子:
def my_function():
    """Do nothing, but document it.

    No, really, it doesn't do anything.
    """
    pass

print(my_function.__doc__)
# Do nothing, but document it.

#     No, really, it doesn't do anything.
打印
dart
print('The number is $aNumber.'); // 在控制台打印内容。go
fmt.Printf("Hello %d\n", 23)
fmt.Fprint(os.Stdout, "Hello ", 23, "\n")
fmt.Println("Hello", 23)
fmt.Println(fmt.Sprint("Hello ", 23))

var x uint64 = 1<<64 - 1
fmt.Printf("%d %x; %d %x\n", x, x, int64(x), int64(x))

// 若你只想要默认的转换,如使用十进制的整数,你可以使用通用的格式 %v(对应“值”);
// 其结果与 Print 和 Println 的输出完全相同。
// 此外,这种格式还能打印任意值,甚至包括数组、结构体和映射。
fmt.Printf("%v\n", timeZone)  // 或只用 fmt.Println(timeZone)

// 改进的格式 %+v 会为结构体的每个字段添上字段名,
// 而另一种格式 %#v 将完全按照Go的语法打印值。
type T struct {
  a int
  b float64
  c string
}
t := &T{ 7, -2.35, "abc\tdef" }
fmt.Printf("%v\n", t)
fmt.Printf("%+v\n", t)
fmt.Printf("%#v\n", t)
fmt.Printf("%#v\n", timeZone)
// &{7 -2.35 abc   def}
// &{a:7 b:-2.35 c:abc     def}
// &main.T{a:7, b:-2.35, c:"abc\tdef"}
// map[string] int{"CST":-21600, "PST":-28800, "EST":-18000, "UTC":0, "MST":-25200}
js
console.log(`The number is ${aNumber}.`)
var number = 11 * 9;
var color = 'red';
console.log('%d %s balloons', number, color);

console.log(' %s + %s ', 1, 1, '= 2')
// 1 + 1  = 2

console.log({foo: 'bar'})
// Object {foo: "bar"}
console.log(Date)
// function Date() { [native code] }

var languages = [
  { name: "JavaScript", fileExtension: ".js" },
  { name: "TypeScript", fileExtension: ".ts" },
  { name: "CoffeeScript", fileExtension: ".coffee" }
];
console.table(languages);

var languages = {
  csharp: { name: "C#", paradigm: "object-oriented" },
  fsharp: { name: "F#", paradigm: "functional" }
};
console.table(languages);

console.assert(false, '判断条件不成立')
// Assertion failed: 判断条件不成立
// 相当于
try {
  if (!false) {
    throw new Error('判断条件不成立');
  }
} catch(e) {
  console.error(e);
}
python
print('The number is {}.'.format(aNumber)) #打印格式化
dart
pub global activate dart_style
dartfmt test.dart
go
go fmt <文件名>.go
# go fmt是gofmt的上层一个包装的命令
gofmt
js
python
变量
dart
// 不要 显式的把变量初始化为 null
int _nextId;
assert(_nextId == null);

// 没有明确类型
var name = 'Bob';
Object name = 'Bob';
dynamic name = 'Bob';

// 可以选择加上具体 类型
// 对于局部变量,这里准守 代码风格推荐 部分的建议,
// 使用 var 而不是具体的类型来定义局部变量。
String name2 = 'Bob';

// 定义集合
var points = [];
var addresses = {};
// 如果有必要还可以提供泛型类型
var points = <Point>[];
var addresses = <String, Address>{};
go
var 语句用于声明一个变量列表,跟函数的参数列表一样,类型在最后。
函数和包级别的变量(package-level entities)可以任意顺序声明,并不影响其被调用。
package main
import "fmt"
var c, python, java bool
func main() {
  var i int
  fmt.Println(i, c, python, java)
}


// 变量声明可以包含初始值,每个变量对应一个。
// 如果初始化值已存在,则可以省略类型;变量会从初始值中获得类型。
package main
import "fmt"
var i, j int = 1,0
func main() {
  var c, python, java = true, false, "no!" // 自动获得类型
  fmt.Println(i, j, c, python, java) // 1 0 true false no!
}


// 在函数中,简洁赋值语句 := 可在类型明确的地方代替 var 声明。
// 函数外的每个语句都必须以关键字开始(var, func 等等),
// 因此 := 结构不能在函数外使用。
package main
import "fmt"
func main() {
  var i, j int = 1, 2
  k := 3
  c, python, java := true, false, "no!"
  fmt.Println(i, j, k, c, python, java) // 1 2 3 true false no!
}

// 简短变量声明语句中必须至少要声明一个新的变量
// 下面的代码将不能编译通过
// 解决的方法是第二个简短变量声明语句改用普通的多重赋值语句。
f, err := os.Open(infile)
// ...
f, err := os.Create(outfile) // compile error: no new variables


// 另一个创建变量的方法是调用用内建的new函数。
// 表达式new(T)将创建一个T类型的匿名变量,初始化为T类型的零值,
// 然后返回变量地址,返回的指针类型为*T
p := new(int)   // p, *int 类型, 指向匿名的 int 变量
fmt.Println(*p) // "0"
*p = 2          // 设置 int 匿名变量的值为 2
fmt.Println(*p) // "2"

p := new(int)
q := new(int)
fmt.Println(p == q) // "false"

// 下面的两个newInt函数有着相同的行为:
func newInt() *int {
  return new(int)
}
func newInt() *int {
  var dummy int
  return &dummy
}


f, err = os.Open("foo.txt") // function call returns two values
v, ok = m[key]             // map lookup
v, ok = x.(T)              // type assertion
v, ok = <-ch               // channel receive
_, err = io.Copy(dst, src) // 丢弃字节数
_, ok = x.(T)              // 只检测类型,忽略具体值
js
// var name = 'Bob';
let name = 'Bob';


// 分组声明
import(
  "fmt"
  "os"
)

const(
  i = 100
  pi = 3.1415
  prefix = "Go_"
)

var(
  i int
  pi float32
  prefix string
)
python
name = 'Bob'私有变量
dart
// 变量名以"_"开头意味着对它的 lib 是私有的
var _name = 'Bob';
go
js
python
常量
dart
-
dart的
final类似于js中的const,只能定义一次,但可运行时才确定值, 如果是复杂对象,内存地址不变,但是对象的成员是可变的。 -
dart的
const比final限制更严格,在编译时需有确定值,运行时不可变, 不但内存地址不变,对象的成员也都不可变。
// 一个 final 变量只能赋值一次
final name = 'Bob';
final String name = 'Bob';
// 一个 const 变量是编译时常量
const bar = 1000000;
var varList = const [];
go
程序编译阶段就确定下来的值,而程序在运行时无法改变该值。 目前常量声明的值必须是一个数字值、字符串或者一个固定的boolean值。
- 常量的声明与变量类似,只不过是使用 const 关键字。
- 常量可以是字符、字符串、布尔值或数值。
- 常量不能用 := 语法声明。
- 它们在编译时创建
- 定义它们的表达式必须也是可被编译器求值的常量表达式
package main
import "fmt"
const Pi = 3.14
func main() {
  const World = "世界"
  fmt.Println("Hello", World)
  fmt.Println("Happy", Pi, "Day")
  const Truth = true
  fmt.Println("Go rules?", Truth)
}


// 数值常量是高精度的 值。
package main
import "fmt"
const (
  // 将 1 左移 100 位来创建一个非常大的数字
  // 即这个数的二进制是 1 后面跟着 100 个 0
  Big = 1 << 100
  // 再往右移 99 位,即 Small = 1 << 1,或者说 Small = 2
  Small = Big >> 99
)
func needInt(x int) int { return x*10 + 1 }
func needFloat(x float64) float64 {
  return x * 0.1
}
func main() {
  fmt.Println(needInt(Small))
  fmt.Println(needFloat(Small))
  fmt.Println(needFloat(Big))
}


const (
  a = 1
  b
  c = 2
  d
)
fmt.Println(a, b, c, d) // "1 1 2 2"


// iota将会被置为0,然后在每一个有常量声明的行加1
// 周日将对应0,周一为1,如此等等
type Weekday int
const (
  Sunday Weekday = iota
  Monday
  Tuesday
  Wednesday
  Thursday
  Friday
  Saturday
)

// 随着iota的递增,每个常量对应表达式1 << iota,
// 是连续的2的幂,分别对应一个bit位置。
type Flags uint
const (
  FlagUp Flags = 1 << iota // is up
  FlagBroadcast            // supports broadcast access capability
  FlagLoopback             // is a loopback interface
  FlagPointToPoint         // belongs to a point-to-point link
  FlagMulticast            // supports multicast access capability
)


// 无类型常量
var x float32 = math.Pi
var y float64 = math.Pi
var z complex128 = math.Pi
js
- js的
const类似与dart的final,声明一个只读的常量。 - 对于简单类型的数据(数值、字符串、布尔值),值就保存在变量指向的那个内存地址,因此等同于常量。
- 但对于复合类型的数据(主要是对象和数组),变量指向的内存地址, 保存的只是一个指向实际数据的指针, const只能保证这个指针是固定的(即总是指向另一个固定的地址), 至于它指向的数据结构是不是可变的,就完全不能控制了
const name = 'Bob';python
# 自定义
class Const:
  class ConstError(TypeError) :
    pass
  class ConstCaseError(ConstError):
    pass

  def __setattr__(self, name, value):
    if name in self.__dict__:
      raise self.ConstError, "Can't change const value!"
    if not name.isupper():
      raise self.ConstCaseError, 'const "%s" is not all letters are capitalized' %name
    self.__dict__[name] = value

import sys
sys.modules[__name__] = Const()

# 使用
import constant
constant.MAX_COUNT=1
默认值
也叫零值。 未初始化的变量自动获取的值
dart
int lineCount;
print(lineCount);
// null
go
没有明确初始值的变量声明会被赋予它们的 零值:
- 数值类型为 0,
- 布尔类型为 false,
- 字符串为 ""(空字符串)。
- 指针零值为 nil
- 切片的零值是 nil
package main
import "fmt"
func main() {
  var i int
  var f float64
  var b bool
  var s string
  fmt.Printf("%v %v %v %q\n", i, f, b, s) // 0 0 false ""
}

int     0
int8    0
int32   0
int64   0
uint    0x0
rune    0 //rune的实际类型是 int32
byte    0x0 // byte的实际类型是 uint8
float32 0 //长度为 4 byte
float64 0 //长度为 8 byte
bool    false
string  ""
js
let lineCount;
console.log(lineCount);
// undefined
python